Next.js 14のServer Actionsを試してみたぞ!
はじめに
2023.10.26にNext.js 14がリリースされました。
今回のアップデートで、Next.js 13で紹介されたServer ActionsがStable(安定)になりました。
Server Actionsは、紹介当初は「昔のPHPみたいだ!」と賛否両論(?)だったようですが、、、せっかく安定版になったので、 私も本番導入に向けて少し試してみました。試した範囲になりますが、簡単な使い方と注意点を共有します。
前提知識
Server ActionsはNext.js 13で導入されたApp Routerの機能の一部になります。使う上では、Server ComponentやClient Componentの違い等、App Routerの基礎的な知識は必要になります。
なおApp Routerについては過去記事にしているので、良かったら参考にしてください。
環境
- Next.js等のパッケージ
Next.js 14です。
{
  "next": "^14.0.1",
  "react": "^18.2.0",
  "react-dom": "^18.2.0"
}
- Node.js
Next.js 14を使うには、Node.jsのバージョンがv18.7以上である必要があります。
> node --version
v18.18.2
また、Server ActionsはApp Routerの利用が前提となります。従来のPages Routerでは使用できないため、ご注意ください。
Server Actionsとは
Server Actionsは、form要素のsubmit時のサーバ側の処理を簡単に制御する機能です。Next.js 13で紹介され、v14で安定となりました。
公式ドキュメントでは、「Next.jsはServer Actionsを使った、formのsubmitとデータ変換を制御するパワフルな機能を提供します。Server Actionsでは、エンドポントを手動で作成する必要はありません。代わりに、コンポーネントから直接呼び出すことのできる、非同期のサーバー関数を定義します。」と記載されています(私による和訳)。
formのsubmitの場合、通常は/api/helloのようなエンドポイントを定義してサーバ側の処理を記述します。
Server Actionsを使えば、サーバ側の処理を直接呼び出すことができるため、エンドポイントを作成する必要がなく、簡単に処理が書けるというのがメリットのようです。
以下は、従来の書き方と、Server Actionsを使った場合の簡単な書き方の例です。
いままでのformの例
クライアント側
エンドポイント/api/submitを指定して、fetch関数でデータをPOSTしています。
"use client";
export default function MyForm() {

  // submit処理
  const submit = (e:React.FormEvent<HTMLFormElement>) => {

    // defaultのsubmit処理を無効化
    e.preventDefault();

    fetch("/api/submit", {
      method: "POST",
      body: JSON.stringify({ message: "hello,word" }),
    })
  }

  return (
    <form style={{ textAlign: "center" }} onSubmit={submit}>
      <button type="submit">送信</button>
    </form>
  )
}
サーバ側
エンドポイントとなる/app/api/submit/route.tsにサーバ側の処理を記載しています。
import { NextResponse, NextRequest } from "next/server";

export async function POST(req: NextRequest) {
    const { message } = (await req.json()) as { message?: string }
    console.log(message);
    return NextResponse.json("ok", { status: 200 })
}
Server Actionsを使った場合の例
// server action
async function submitAction(formData: FormData) {
  "use server"
  console.log("hello,world");
}

export default function MyForm() {
  return (
    <form action={submitAction}>
      <button type="submit">submit</button>
    </form>
  )
}
formのactionに、submit時にサーバで実行される関数を直接渡しているのがミソです。そして、サーバ側で実行される関数には、最初に"use server"
の文字列が記載されています。この文字列が、関数がServer Actionであることを示す大事な役割を果たしています。
エンドポイントの作成は不要で、これだけでformのsubmit時にsubmitActionが実行されます。
Server Actionsの使い方
Server Actionを利用する際に、いくつか押さえておくべきルールがあります。
なお、ここではformのsubmit時にサーバ側で実行される関数のことを、Server Actionと表記していますので、ご了承ください。
1. Server Actionは非同期関数である必要がある
これはシンプルで、言葉の通りです。async function myAction(formData){}のように、Server Actionはasyncをつけて非同期関数にする必要があります。
なお、form内の要素(inputタグ等)の値はFormData型として第一引数で受け取ることができます。
/**
 * Server Action関数:
 * - 非同期関数である必要があります
 * - 第一引数に、FormData型としてform内の要素の値が渡されます
 */
async function myAction(fd:FormData){
  "use server";
  // server側の処理
}
2. Server ActionはServer Component、もしくは個別のファイルで定義できる
Server Component内で定義する場合
Server Componentであれば、直接同ファイル内にServer Actionを定義することができます。
App Routerでは、ファイルの冒頭に"use client"が無いコンポーネントがServer Componentと解釈されます。なので、"use client"が付いていないコンポーネントであれば、以下のように同ファイル内で定義が可能です。
// server action
async function myAction(formData: FormData) {
  "use server"
  // サーバ側の処理
}

export default function SomeServerComponent() {
  return (
    <form action={myAction}>
      <button type="submit">submit</button>
    </form>
  )
}
しかし、以下のようにClient Component内でServer Actionを定義するとエラーになります。
"use client"
// server action
async function myAction(formData: FormData) {
  "use server"
  // サーバ側の処理
}

export default function SomeClientComponent() {
  return (
    <form action={myAction}>
      <button type="submit">submit</button>
    </form>
  )
}
実際にブラウザで開いてみると、以下のようなエラーで怒られます。
Error: × It is not allowed to define inline "use server" annotated Server Actions in Client Components. To use Server Actions in a Client Component, you can either export them from a separate file with "use server" at the top, or pass them down through props from a Server Component. Read more: https://nextjs.org/docs/app/api-reference/functions/server-actions#with-client-components
「Client Componentでは"use server"をつけたServer Actionを定義することはできません。Client Componentで使うためには、別のファイルでServer Actionを定義するか、Server Actionをpropとして渡してください。」といった内容です。
個別のファイルで定義する場合
単独のファイルでServer Actionを定義することもできます。この方法ならば、Server ComponentでもClient Componentでもimportして使うことが出来るので便利です。
ルールは簡単で、ファイルの冒頭に"use server"を付けるだけです。そうすると、ファイル内でexportされた関数は全てServer Actionとして解釈されます。
ファイルの置き場所やファイル名は何でもOKです。
以下のようなファイルになります。ファイル名はmy-actions.tsにしています。
"use server"

/**
 * - exportされたファイルは全てServer Actionとして解釈されます
 * - 複数宣言可能です
 * - Client/Server Componentどちらからでもimportして使えます
 */

import { redirect } from "next/navigation";

// Server Action関数
export async function myAction(fd: FormData) {
    redirect("/socket");
}

// 別のServer Action関数
export async function myAction2(fd: FormData) {
    const name = fd.get("name");
    console.log(name);
}
後は、Server ComponentなりClient Componentなりで、importして使うだけです。
"use client"

// Server Actionをimport
import { myAction } from "./my-actions";
import { useState } from "react";

export default function Page() {
  const [name, setName] = useState("")
  return (
    {/* Server Actionを設定 */}
    <form action={myAction}>
      <input type="text" value={name} name="name" onChange={e => setName(e.target.value)} />
      <button type="submit">submit</button>
    </form>
  )
}
Client ComponentでServer Actionを使う場合
Server Component内で定義する場合で見たとおり、Client Component内でServer Actionを直接定義できません。エラーメッセージにもあったとおり、Client CompnentでServer Actionを使うためには、以下のいずれかの方法で行う必要があります。
- Server Actionを単独のファイルで定義してimportする
- Server ActionをClient Componentのpropsとして渡す
1点目は既に上で確認していますので、2点目を見ていきます。
Client Component
propsとして受け取っているaction関数がServer Actionとなります。
"use client"
import { useState } from "react";

interface Prop {
  action: (fd: FormData) => Promise<void>
}

export default function MyClient({ action }: Prop) {

  const [name, setName] = useState("")

  return (
    {/* propsとして受け取ったServer Actionを設定 */}
    <form action={action}>
      <input
        type="text"
        value={name}
        onChange={e => setName(e.target.value)}
        name="user-name"
      />
      <button type="submit">submit</button>
    </form>
  )
}
Server Component
Client ComponentにServer Actionとして定義したmyActionを渡しています。
import MyClient from "./MyClient"

async function myAction(formData: FormData) {
  "use server"
  const name = formData.get("user-  name");
  console.log(name)
}

export default function Page() {
  // Client ComponentにpropsとしてServer Actionを渡す
  return <MyClient action={myAction} />
}
これで問題なく動きます。
余談:Server ComponentからClient Componentに関数を渡す?
ここで、「んん?」と思った方もいるかもしれません。公式ドキュメントでは、Server ComponentからClient Componentに渡すことができるpropsは、Reactによってシリアライズ可能な値に限ると記載されています。
基本的には、JSONに変換可能なデータや、数字や文字列のような値に限られ、Date型や関数は渡すことが出来ないはずです。
実際、Server ComponentからClient Componentに関数をpropsとして渡すと、以下のようなエラーになります。
Error: Functions cannot be passed directly to Client Components unless you explicitly expose it by marking it with "use server".
「"use server"がついていない限り、Client Componentに関数を直接渡すことが出来ません」と怒られています。
なので、Server Actionは例外的に渡すことが出来るだけで、関数は従来どおり渡すことはできません。
Server Actionは、ビルド時に分離されブラウザに送られるJavaScriptにはバンドルされないとのことです。なので、文法的にはpropsとして渡すような記法ですが、実際にServer ActionをClient Componentに降ろしている訳ではなく、通常の関数とは扱いが異なるのかもしれませんね。
Server Actionsの実装例
ここまではServer Actionsの使い方を簡単に触れただけでしたので、実際に使いそうなシナリオで作ってみようと思います。
cookieをつけて別ページへリダイレクト
IDやパスワードをチェックして、OKならcookieをつけて別ページにリダイレクトさせます。
Server Component
import { cookies } from "next/headers";
import { redirect } from "next/navigation";
import ClientParts from "./ClientParts";
// 自作の認証関数(適当)
import { myAuth } from "./myauth";

async function myAction(formData: FormData) {
  "use server"
  // formDataからuserIdとpasswordを取得
  const userId = formData.get("user-id") as string;
  const password = formData.get("password") as string;

  // 認証OKならcookieを設定し、/memberページにリダイレクト
  if (myAuth(userId, password)) {
    // cookieに設定する値
    const data = userId + password;
    // cookieをセット
    cookies().set("cert", data, { secure: true })
    // リダイレクト
    redirect("/member");
  }
}

export default function Page() {
  return (
    <>
      <h1 style={{ textAlign: "center" }}>cookieを設定してリダイレクト</h1>
      <form action={myAction}>
        <ClientParts />
      </form >
    </>
  );
}
Server ActionとなるのはmyAction関数です。formから入力値を受け取り、認証が通ればcookieをセットしてmemberページにredirectさせています。
form内の各要素はonChangeのようなイベントを登録する必要があるので、ClientPartsの名前でClient Componentにしています。
Client Component
ここは特筆部分はありません。userIdとpasswordを入力するためのinputタグと、submit用のbuttonタグを設定しています。
"use client";

import { useState } from "react";

export default function ClientParts() {

  const [userId, setUserId] = useState("");
  const [password, setPassword] = useState("");

  return (
    <>
      <input
        type="text"
        value={userId}
        onChange={e => setUserId(e.target.value)}
        name="user-id"
        style={{ display: "block", margin: "auto" }}
      />
      <input type="text"
        value={password}
        onChange={e => setPassword(e.target.value)}
        name="password"
        style={{ display: "block", margin: "auto" }}
      />
      <button
        type="submit"
        style={{ display: "block", margin: "auto" }}
      >
        submit
      </button>
    </>
  )
}
ブラウザで確認
実際にページを開いてsubmitボタンを押してみます。

ちゃんとmemberページに遷移しました。
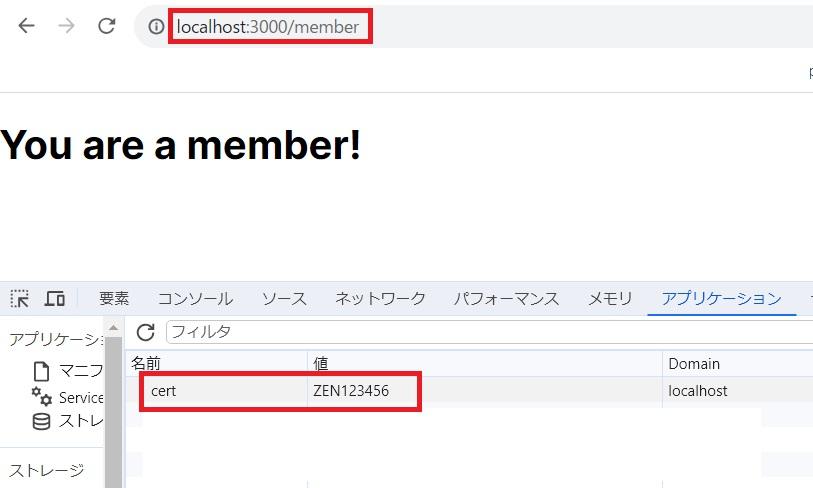
certの名前でcookieが設定されていることも確認できます。
Server Actionからレスポンスを返す
クライアントにレスポンスとしてデータを返すことも出来ます。
今度は、formで入力したuserIdとpasswordをDBに登録し、成功なら{message: "insert succeeded"}、失敗なら{message: "insert failed"}とクライアントに返す例を考えてみます。
Server Actionの返り値をクライアント側で扱うには、useFormStateというReactのHookを使う必要があります。ただし、現時点ではReact Canaryの機能で、安定版ではない点は留意したほうがよいかもしれません。
この例ではHookを使うのでページ全体をClient Componentにします。そのため、Server Actionは単独ファイルで定義し、importして使う方式にします。
Client Component
ページ全体がClient Componentになっています。importしているinsertDBがServer Actionです。
"use client"

import { useState } from "react"
import { useFormState } from "react-dom"
import { insertDB } from "./my-actions"

export default function Page() {

  const [userId, setUserId] = useState("");
  const [password, setPassword] = useState("");

  // formのsubmit結果を管理するHook。
  // 第一引数:Server Action、第二引数:Server Actionが返すデータの初期値
  // 1つ目の返り値: Server Actionが返すデータの現在の状態
  // 2つ目の返り値: 状態管理を行う新しいServer Action
  const [formState, formAction] = useFormState(insertDB, { message: null })

  return (
    <>
      <h1 style={{ textAlign: "center" }}>Server Actionからレスポンス</h1>
      {/* useFormStateで取得した新しいServer Actionを設定 */}
      <form action={formAction}>
        <input
          type="text"
          value={userId}
          onChange={e => setUserId(e.target.value)}
          name="user-id"
          style={{ display: "block", margin: "auto" }}
        />
        <input
          type="text"
          value={password}
          onChange={e => setPassword(e.target.value)}
          name="password"
          style={{ display: "block", margin: "auto" }}
        />
        <button
          type="submit"
          style={{ display: "block", margin: "auto" }}>
          submit
        </button>
      </form>
      {/* Server Actionの結果を表示 */}
      <div style={{ textAlign: "center" }}>{formState.message}</div>
    </>
  )
}
useFormStateで、formのsubmit結果の状態を管理できます。第一引数がServer Actionとなる関数で、第二引数が返ってくるデータの初期値となります。今回の例では、{message: null}で初期化しています。
useFormStateの返り値は2つあります。
1つ目(formState)は現在の状態です。useStateの1つ目の返り値と同じ考え方で大丈夫です。
2つ目(formAction)はformStateを管理してくれる、新しいServer Actionです。例のとおり、これをformタグのactionに設定します。
Server Action
ファイル名はmy-actions.tsにしています。
"use server";

// DBにユーザ登録する関数(適当)
import { insertUser } from "./db";

interface ServerResponse {
    message: string | null;
}

export async function insertDB(
    prevState: ServerResponse,
    formData: FormData,
) {
    const userId = formData.get("user-id")
    const password = formData.get("password");
    const isSucceed = await insertUser(userId, password);
    // DB登録の成否に応じたメッセージを返す
    return {
        message: isSucceed ? "insert succeeded" : "insert failed"
    }
}
importしているinsertUserが、便宜的に作ったユーザを登録する関数です。成功したらtrue、失敗ならfalseを返します。
insertDBがServer Actionです。フォームの入力値をDBに登録し、その成否に応じたメッセージをクライアントに返します。
今までの例では、Server Actionの引数はFormDataの1つだけでしたが、今回は2つになっています。第一引数のprevStateが、useFormStateで管理されているデータの現在の状態です。今回の例では初回は{message:null}となります。Server Actionを実行する都度更新されるので、prevStateと名前をつけています。
ブラウザで確認
実際にページを開いてみてみます。
- 初期表示

- エラー時
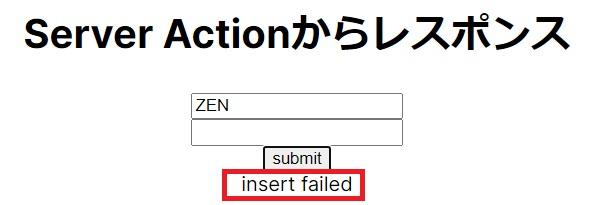
- OK時
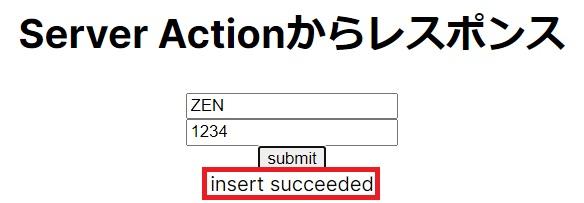
ちゃんとServer Actionからのレスポンスが表示されていることが確認できます。
最後に
Server Actionsの簡単な使い方を紹介しました。
余談になりますが、Server ActionsはNext.js独自の機能なのかな、と思っていたらReact Canaryにドキュメントがありました。ベースはReactみたいですね。
私もまだ深く踏み込めていませんが、Server Actionsの他のメリットとして、条件を満たせばブラウザでJavaScriptを無効にしても動作することや、Next.jsの他の機能と同様にcacheやrevalidationの対象になることが挙げられます。
本番でも試してみたいですが、そもそも私のサイトではformの数が少ないので、しばらく先になりそうです。まずはNext.js 14にアップグレードしないといけないですしね。
しかし、更新が非常に早いですね~!
参考
- Server Actions: https://nextjs.org/docs/app/api-reference/functions/server-actions
- Forms and Mutations: https://nextjs.org/docs/app/building-your-application/data-fetching/forms-and-mutations
- useFormState: https://react.dev/reference/react-dom/hooks/useFormState